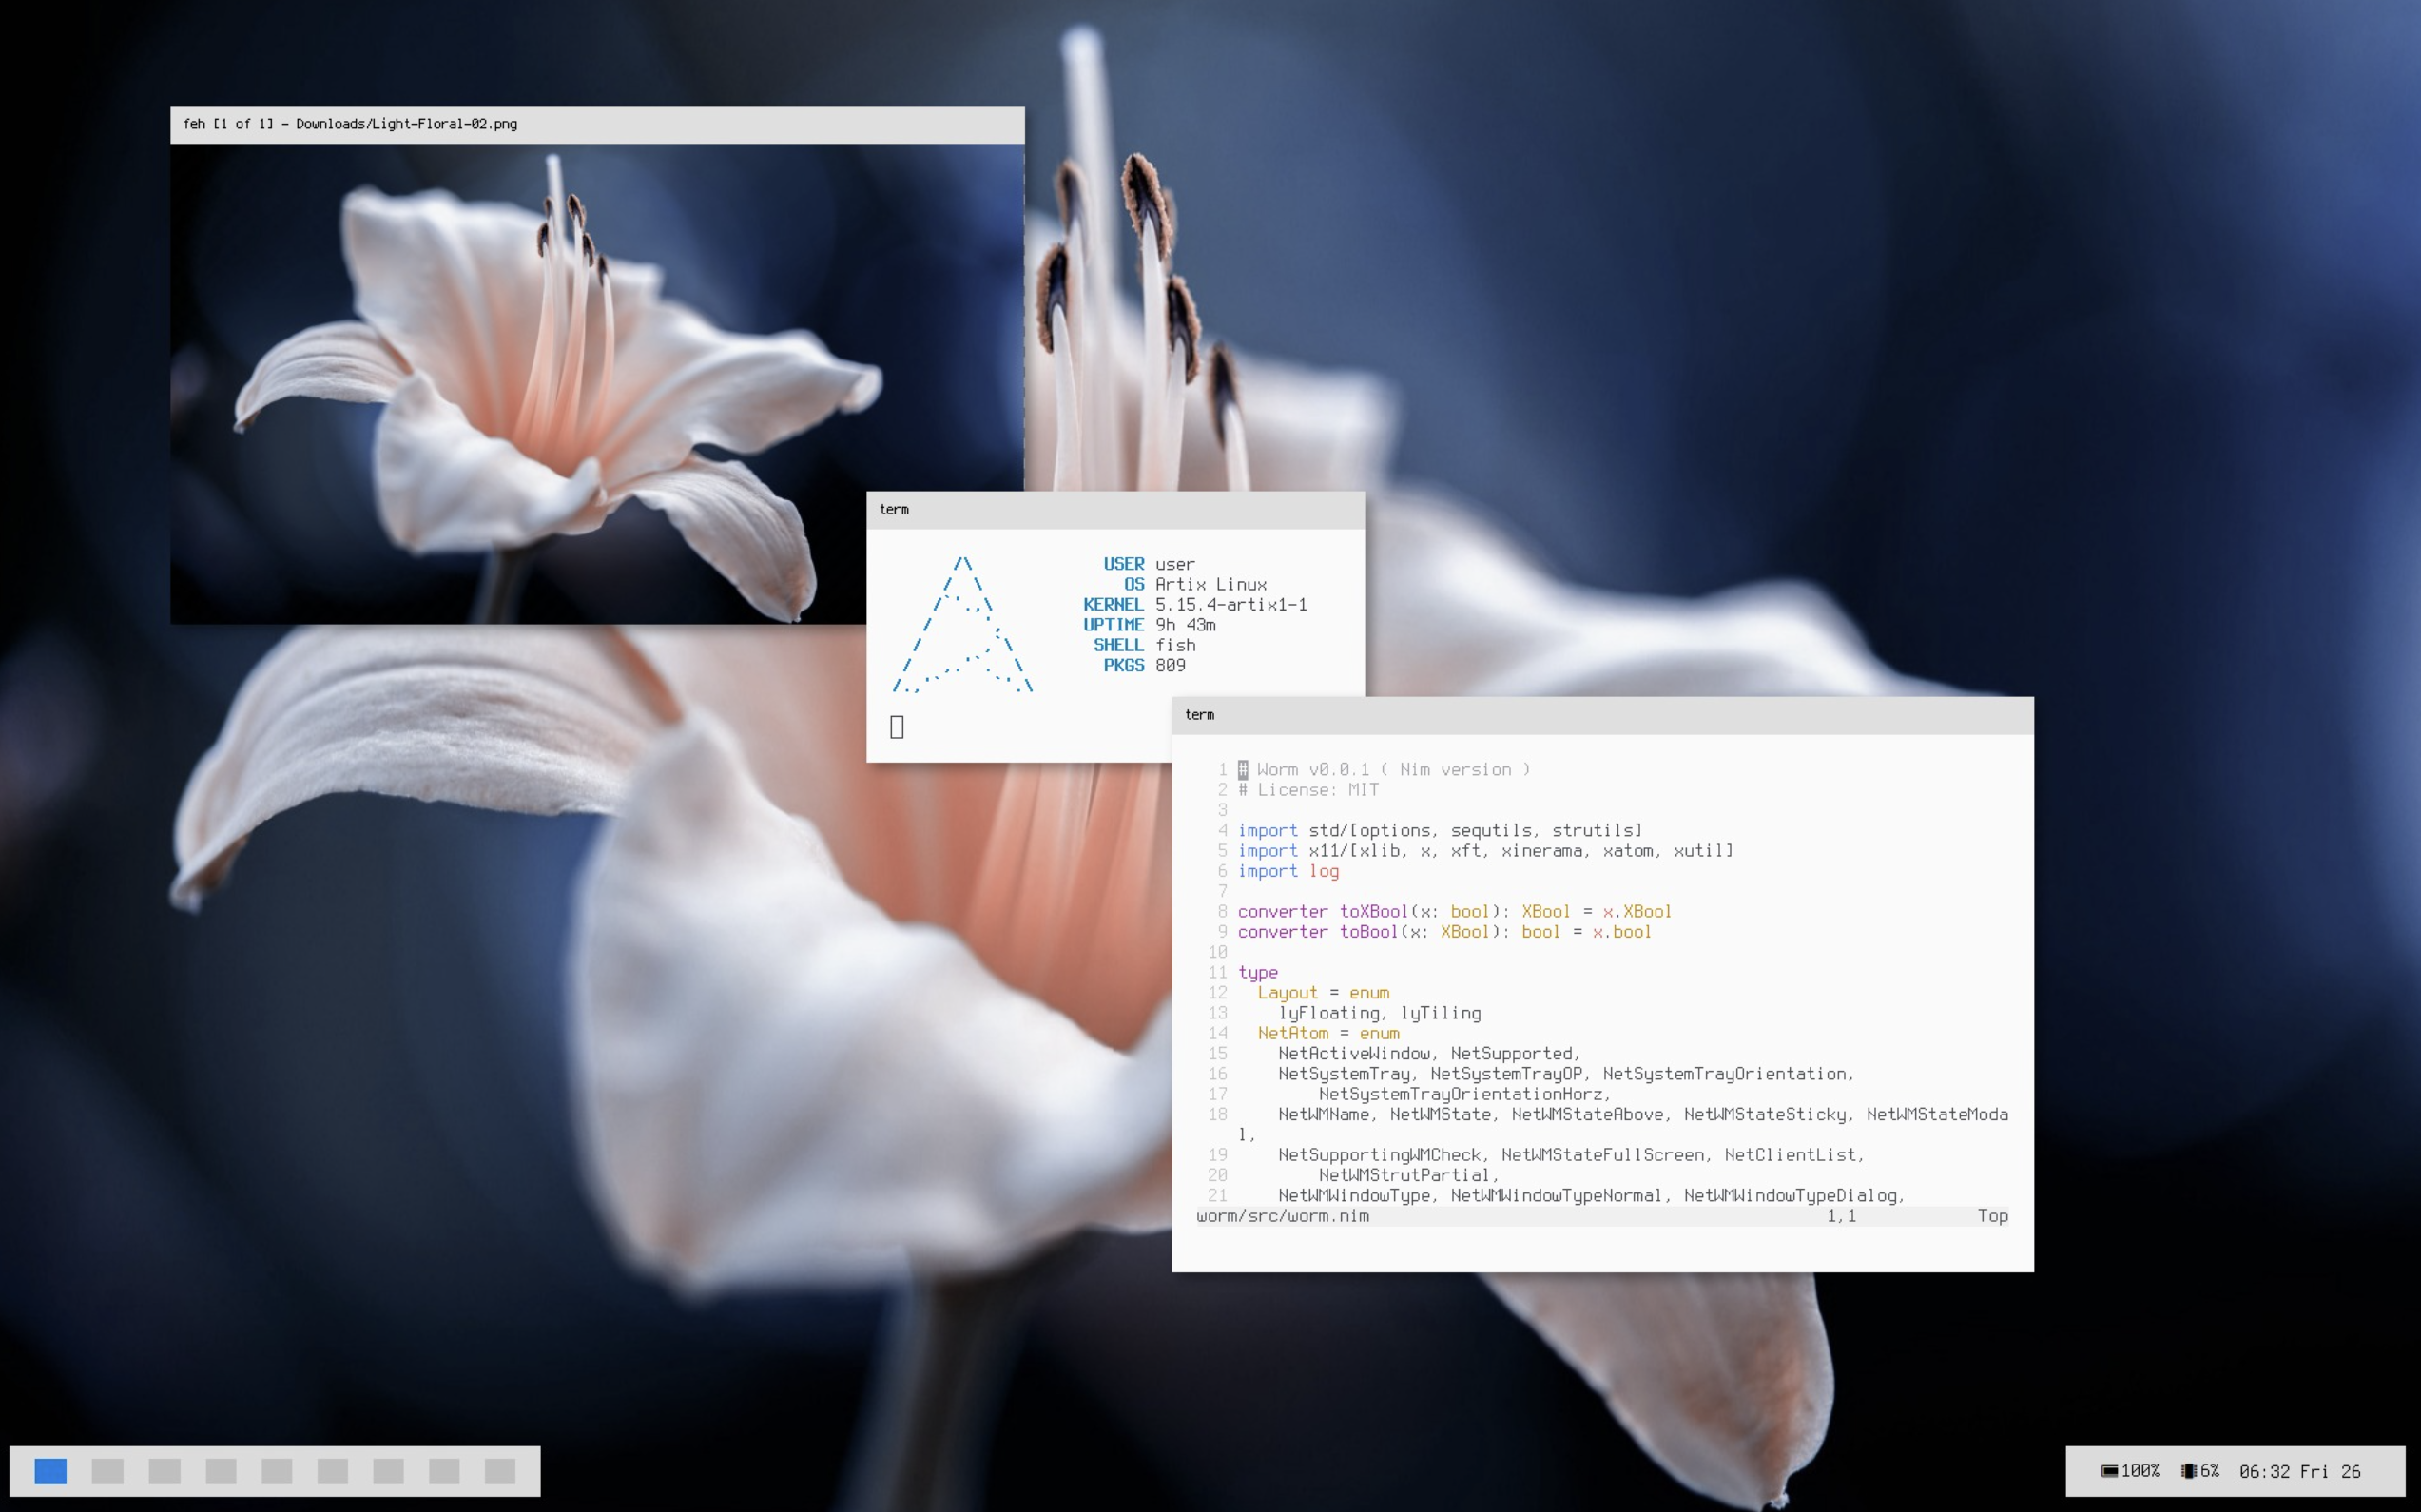
A couple years ago, especially during the COVID pandemic, I was very interested in customizing my Linux desktop - a process many known as "ricing", originating in automotive slang for customized cheap Asian cars. Through the process I realized that while the pleathora of desktop environments and window managers offered everything I could possibly want, it'd be cooler to build my own.
While the Wayland protocol is the standard for modern desktops, with X11 being effectively obsolete, I wrote worm during the period when the *nix community was in the process of transitioning, and X11 was still the default display server on most desktop-oriented distributions. X11 does a lot of the heavy lifting for you, acting as the display server which actually renders pixels onto your screen. It seperates the compositor (think picom or compiz) - which renders windows off-screen to prevent tearing - from the window manager. As such, your window manager's logic focuses solely on actually managing windows, and not low-level complex graphics APIs.
Initially, I wrote worm in Rust, but I ran into a couple limitations of the x11rb library I chose to use and the borrow checker kinda got on my nerves with X11 types, so I migrated to another language I really liked - Nim. In this article, rather than the rewrite (as the Rust version was a very simple, non-reparenting WM) I'll focus on the technical architecture of the current version.
Reparenting vs non-reparenting WMs
There are two major types of window managers: reparenting and non-reparenting.
X11's hierarchy
In X11, the window manager is a client of the server just like every other application on your screen - it just happens to be the one that launches first and therefore controls the others. These clients follow a hierarchy where windows can have both parent and child windows. When your X11 server initializes, it will create a root window, similar to how a root directory / works in a file tree. Every client launched after is thus a child of the root window (analogous to /usr, /lib, ...).
Why do we care?
Reparenting window managers take advantage of this hierarchy. Whenever an application is launched, they "re-parent" it. Instead of the application being a direct child of the root window, it is now the child of a window created by the window manager. This new parent window is managed by us, and serves to handle drawing the titlebar, as well as moves and resizes. This technique is how almost (I say almost because projects like berry don't) every window manager that draws titlebars does so - whether it's a free-standing WM like openbox, or the WMs that come with desktop environments (Gnome's mutter, KDE's kwin, ...)
Non-reparenting windows are a lot simpler to build, and they can manage windows just fine. Many window managers such as dwm and bspwm are non-reparenting. But the standard way to do titlebars - a feature I really wanted - is to have a larger parent window and blit the pixels for the buttons, titles, etc. directly upon that window.
However, this approach comes with a major caveat: the window manager now has to act as a mini X11 system itself. You aren't just deciding where a window goes anymore, but you have to handle all the events of that child window.
X11's Event Loop
A window manager is really just a glorified event loop. It spends a lot of it's time idling and waiting for the next event.
proc eventLoop*(self: var Wm) =
  while true:
    discard self.dpy.XNextEvent(unsafeAddr self.currEv)
    self.dispatchEvent self.currEv
Once it does recieve an event to handle, it dispatches it to the appropriate handler.
proc dispatchEvent*(self: var Wm; ev: XEvent) =
  case ev.theType:
  of ButtonPress: self.handleButtonPress ev.xbutton
  of ButtonRelease: self.handleButtonRelease ev.xbutton
  of MotionNotify: self.handleMotionNotify ev.xmotion
  # ... so on and so forth ...
Some events of note:
MapRequest
When a window wants to be displayed on the screen, it sends a MapRequest. Worm listens for these and intercepts them with perhaps it's lengthiest event handler. This is wwhere the actual reparenting happens. First, a new parent window is created with the appropriate dimensions, which it fetches from the user's settings:
var frameAttr = XSetWindowAttributes(backgroundPixel: culong self.config.frameActivePixel,
    borderPixel: self.config.borderActivePixel, colormap: attr.colormap)
let frame = self.dpy.XCreateWindow(self.root, attr.x +
    self.config.struts.left.cint, attr.y + self.config.struts.top.cint, cuint attr.width, cuint attr.height +
    cint frameHeight,
    cuint self.config.borderWidth, attr.depth,
    InputOutput,
    attr.visual, CWBackPixel or CWBorderPixel or CWColormap, addr frameAttr)
and then this window is set as the parent of the window the event was called for.
discard self.dpy.XReparentWindow(ev.window, frame, 0, cint frameHeight)
This new parent window, in addition to the child window it just gained, will spawn a couple other children for it's window controls and title. That looks like this:
let minimize = self.dpy.XCreateWindow(top, cint attr.width -
    self.config.buttonSize.cint, 0, self.config.buttonSize.cuint, cuint frameHeight,
    0, attr.depth,
    InputOutput,
    attr.visual, CWBackPixel or CWBorderPixel or CWColormap, addr frameAttr)
worm maintains this hodgepodge collection of windows grouped under one parent window as one Client, with the actual application window in one field and all the other frame subwindows in another:
self.clients.add Client(window: ev.window, frame: Frame(window: frame,
    top: top, close: close, maximize: maximize, minimize: minimize,
    title: titleWin), draw: draw, color: color,
    title: $title, tags: self.tags, floating: self.layout == lyFloating,
    frameHeight: frameHeight, csd: csd, class: $chr.resClass, maximized: max)
There's a lot more to it - ensuring the newly opened window has the right focus on the actual application, checking de-facto standardized NetWM atoms (X11's way of storing window properties) to handle window titles, and more... but that'd be out of scope for a blog post.
ButtonPress/ButtonRelease
Now that we have a window on the screen, it would be nice to be abel to actually interact with it. ButtonPress and ButtonRelease handle the holding down and up of buttons on a mouse - whether that's grabbing a titlebar or clicking an application.
This is where having separate windows for each button comes in handy. X11 tells us which window received the event, so we can compare that against the windows stored in our Client. If it's client.frame.close, we know the user clicked the close button, rather than checking the bounds to see if it's within where it should be.
Otherwise, the handler focuses the actual application window, raises it and its frame, and updates the decoration colors to reflect which client is active. For clicks inside the application, there's also this little detail:
discard self.dpy.XAllowEvents(ReplayPointer, ev.time)
This lets the click pass through to the application, since we had 'trapped' it by grabbing it, in X11's terminology.
For moving and resizing, we save the initial mouse event and the frame geometry:
var attr: XWindowAttributes
discard self.dpy.XGetWindowAttributes(client.frame.window, addr attr)
self.motionInfo = some MotionInfo(start: ev, attr: attr)
This doesn't actually move anything yet. It just gives the next handler a starting point.
ButtonRelease is much simpler. Once the mouse button is released, worm releases any pointer grab, clears motionInfo, and redraws the titlebars. The drag is over.
MotionNotify
While the mouse moves, X11 sends MotionNotify events. Most of these aren't interesting to us, so the handler immediately returns unless motionInfo is set.
The actual movement is calculated relative to where the drag started:
let
  xdiff = ev.x_root - motionInfo.start.x_root
  ydiff = ev.y_root - motionInfo.start.y_root
Using root-window coordinates here is useful because the window we're dragging is itself moving. We want to know how far the pointer has moved across the screen, not how far it has moved within a window whose position keeps changing.
If the original button was the left mouse button, these differences are added to the frame's position. If it was the right mouse button, they're added to its width and height instead. This works through the titlebar, or through the configured modifier key (Alt by default) and a mouse button.
Once again, reparenting makes this a little more complicated. Resizing the frame doesn't automatically resize the application inside it, so worm resizes that too, subtracting the titlebar height. It also resizes the titlebar's windows and sends the application a synthetic ConfigureNotify describing its new geometry.
Moving one visible window thus involves keeping several actual X11 windows in agreement.
ConfigureRequest/ConfigureNotify
Applications can also request geometry changes themselves. A ConfigureRequest contains the proposed position, dimensions, stacking order, etc., along with a mask specifying which fields actually matter.
worm passes those requested changes to X11:
var changes = XWindowChanges(x: ev.x, y: ev.y, width: ev.width,
    height: ev.height, borderWidth: ev.borderWidth, sibling: ev.above,
    stackMode: ev.detail)
discard self.dpy.XConfigureWindow(ev.window, cuint ev.valueMask, addr changes)
For a managed application, it also handles moving the surrounding frame where appropriate, and reruns the layout if tiling is enabled.
ConfigureNotify is the other side of this - notification that a geometry change has happened. For a normal, non-fullscreen client, worm resizes the frame to the application's dimensions plus its titlebar, then puts the application back at (0, frameHeight) inside it.
This is one of the less glamorous parts of a reparenting WM. The application knows about its own window, while we know about the frame around it, and both need to agree on where everything belongs.
PropertyNotify
Window titles aren't necessarily fixed when an application starts. Opening another browser tab, for example, can change the title without creating a new window.
worm listens for property changes on the application window and reads _NET_WM_NAME, falling back to the older XFetchName mechanism if necessary. If the title has changed, it updates the stored string and redraws the titlebar.
The current handler is fairly blunt - it checks the title whenever it receives a property notification for a managed client, rather than first checking which property changed. Comparing against the previous title at least avoids drawing it again when nothing relevant happened.
EnterNotify/LeaveNotify
These events tell us when the pointer enters or leaves a window. Since our titlebar buttons are windows too, hovering over them doesn't require a separate hit-testing system.
The handlers set or clear a boolean like closeHovered, then call renderTop. The renderer uses that state to choose the appropriate button image. There are separate images for active, inactive, active-and-hovered, and inactive-and-hovered buttons - a small feature, but a useful one when the whole point is customizing your desktop.
EnterNotify also handles focus-follows-mouse when that mode is enabled. Entering a client's frame can raise and focus the application without requiring a click.
UnmapNotify/DestroyNotify
Eventually, windows go away. These two events sound similar, but unmapping a window only removes it from view; destroying it removes the X11 window itself.
When the application window is unmapped, worm unmaps its frame and removes the client from its managed list. When the application window is destroyed, it destroys the frame as well. Both handlers update the client list exposed to other applications, reset focus, and rerun the tiling layout if needed.
There's an important distinction here: hiding a frame isn't the same as unmapping the application inside it. worm uses the former for things like minimizing and switching tags, so it can hide a client without forgetting that it exists.
Expose
X11 also has Expose events, which indicate that some part of a window needs repainting.
In worm, drawing isn't all centralized in this handler. The map handler waits for an initial exposure before drawing the new titlebar, and most later decoration updates happen explicitly when something changes - the title, focus, hover state, geometry, and so on. The standalone Expose handler currently maps, focuses, and raises the frame when the event refers to a managed application window.
It's a fairly small handler, despite drawing being one of the more involved parts of the WM.
ClientMessage
Not every event comes from a mouse movement or a window changing size. X11 also lets clients send messages to one another.
Some of these follow conventions from EWMH (Extended Window Manager Hints), which let applications and desktop tools interact with a WM without needing to know its particular implementation. worm handles messages for fullscreen and maximized state, activating a window, and switching desktops.
For fullscreen, for example, it saves the old frame geometry, removes the border, and resizes both the frame and application to the screen. The application is moved to (0, 0) inside the frame, taking over the space normally reserved for the titlebar. When fullscreen is removed, worm restores the saved dimensions and titlebar offset.
But ClientMessage isn't limited to standardized messages. We can define our own, which brings us to how worm is configured.
IPC
worm comes with a second executable, wormc, which is how you control it from outside the window manager. Changing colors, switching tags, closing a window, changing layouts... all of these go through the same interface.
For example:
wormc border-width 3
wormc layout tiling
wormc gaps 10
wormc close-active-client
The interesting part is that this doesn't require a separate socket server or another event loop. Both programs are already X11 clients, and X11 already gives us a way to send messages.
Atoms and messages
Earlier I mentioned atoms in the context of window properties. More precisely, an atom is a numeric identifier associated with a name on the X server. Properties use these identifiers, but we can also use them to identify message types and commands.
Both worm and wormc call XInternAtom for the same names:
func getIpcAtoms*(dpy: ptr Display): array[IpcAtom, Atom] =
  for atom in IpcAtom:
    result[atom] = dpy.XInternAtom(($atom).cstring, false)
This gives both processes matching identifiers for names like WORM_IPC_CLIENT_MESSAGE and WORM_IPC_BORDER_WIDTH.
wormc constructs a ClientMessage whose message type is our IPC atom. With format: 32, the message has room for five 32-bit values. The first identifies the command, and the remaining four hold its arguments.
The packing code is pretty small:
proc formatMess(a: Atom, params: varargs[string, `$`]): array[5, clong] =
  result[0] = a.clong

  for i in 1 ..< result.len:
    if i - 1 < params.len:
      result[i] = params[i - 1].parseInt().clong
So wormc border-width 3 becomes a message containing the border-width atom followed by 3. wormc sends it to the root window, where worm is already listening.
Back in handleClientMessage, worm recognizes the IPC message type, checks the command atom, and performs the corresponding operation. For border width, that means updating the configuration and the existing frames, as well as their _NET_FRAME_EXTENTS properties so applications can learn how much space the decorations occupy.
There isn't a special distinction between a configuration command and an action here. One message changes a color; another closes the focused client. They both arrive through the ordinary event loop.
What about strings?
Four numeric arguments are enough for things like gaps or margins, but not an arbitrary font name or path to a button image.
For these commands, wormc first stores the string as a text property on the root window. Then it sends a message identifying the command, without putting the string itself in the message.
For example, setting the title font does this:
of "text-font":
  dpy.sendStrPrep(ipcAtoms[IpcTextFont], params[i+1])
  data = ipcAtoms[IpcTextFont].formatMess()
The WM receives the message, reads the corresponding root-window property, and opens the requested font through Xft. The same mechanism is used for button image paths, the root menu command, decoration rules, and the arrangement of titlebar parts.
The property holds the data, and the event tells worm to go read it.
Configuration and keybindings
This also means the configuration file can just be an executable script. On startup, worm looks for ~/.config/worm/rc and runs it. That script can launch a wallpaper setter, panel, or other applications, then call wormc to configure the WM.
There's no built-in keyboard shortcut handler either. I use sxhkd in the example cnonfig, which maps a key combination to a command:
super + q
    wormc close-active-client

super + m
    wormc master-active
From worm's perspective, it doesn't matter whether the command came from a keyboard shortcut, a startup script, or someone typing in a terminal. It receives the same X11 message from wormc, which is so nicely versatile.
Drawing titlebars
We've talked a lot about creating and moving the titlebar's windows, but not actually putting anything in them.
Most of that happens in renderTop, which takes a client and draws its configured decorations. The titlebar is split into three regions - left, center, and right - each containing a sequence of parts. T is the title, C is close, M is maximize, and I is iconify/minimize.
For example, these commands describe a title on the left and the usual three controls on the right:
wormc frame-left 'T'
wormc frame-right 'I;M;C'
The button images themselves are configured separately.
Text
For the title, worm uses the traditional X11 typography drawing library Xft. When the client is created, it creates an XftDraw associated with the title window. At render time, it measures the string with XftTextExtentsUtf8, then draws it with XftDrawStringUtf8.
Measuring first matters because the title isn't a fixed-width object. If we're centering it, we need to know how wide the rendered text will be. If a button follows it, we need that width to know where the button should go.
The renderer combines those measurements with the configured text and button offsets. There's a fair amount of arithmetic for the different possible arrangements - putting a title between two buttons takes more bookkeeping than just drawing everything from left to right.
The text color is stored on the client and updated when focus changes, so active and inactive windows can look different.
Buttons
The buttons are images loaded through Pixie, a Nim graphics library (think cairo, but in pure Nim.) worm creates an image at the configured button size, fills it with the frame's background color, and draws the loaded button image onto it at the appropriate scale.
It then swaps the red and blue channels into the BGRX order used by this drawing path so the colors render properly, wraps the pixels in an XImage framebuffer (which is what X11 natively draws,) and copies them into the button window with XPutImage.
Before doing that, the renderer chooses which image path to use based on focus and hover state. If a hover image hasn't been provided, it falls back to the ordinary image for that focus state.
The result is a titlebar built out of several small windows, with Xft handling the text and image data handling the controls. X11 supplies the mouse events for those windows, and our handlers connect them back to the client they belong to.
Tags and tiling
The other major piece is deciding which clients should be visible, and where they should go.
Internally, tags are an array of nine booleans, stored both on the WM and on each client. updateTagState checks for a shared active tag and maps or unmaps the client's frame accordingly. The exposed switch and move commands operate on one tag at a time, so in ordinary use they behave much like numbered workspaces.
Tiling is handled by tileWindows. It finds the clients on the current tag that aren't marked floating, uses the first eligible client as the master, and arranges the remaining clients in a stack on the right. With only one tiled client, that client gets the available width.
The geometry calculations account for borders, titlebar height, gaps between windows, and the configured struts (space reserved around the outside, for things like a panel). The current tiling code uses the first screen returned by Xinerama, so this part is fairly simple rather than a complete layout system for multiple monitors, since I never got around to adjsuting it for multi monitor setups.
Setting a different master mostly comes down to changing the order of clients in the list and tiling again. Opening or closing a window, changing tags, or adjusting gaps can all trigger another pass through the same function.
At that point, most of the WM's behavior is accounted for. Wait for an event, find the relevant client, change some state, move or redraw its windows, and repeat.
There's plenty in the source that could be cleaned up, especially the repeated titlebar positioning code and some of the geometry handling. But building worm made it much easier to understand what the window managers I'd been configuring were actually doing. A titlebar, a workspace switch, or a fullscreen button looks pretty simple from the desktop - underneath, it's a collection of windows and messages that somebody has to keep track of.